How to edit videos with Claude + CapCut Web
In this guide, you will learn to edit a video from start to finish with Claude and CapCut Web: remove pauses, strengthen the opening, generate captions, add supporting visuals, and prepare the export.
Before you start
This guide follows one real edit rather than presenting a disconnected feature list. Each stage advances the same project until you have a finished 45-to-60-second vertical short.
To keep the outcome achievable, begin with one person speaking to camera, one to three minutes of raw footage, and only a few visual assets. A long podcast, a multi-camera edit, or a piece with complex animation needs a different workflow and more review.
Through the available controls, Claude can attempt to inspect clips; split, trim, and rearrange; generate and correct captions; place text and uploaded assets; change framing and speed; apply transitions, effects, and audio adjustments; and prepare the export.
The sequence is always the same: request an outcome, approve the plan, let Claude act, verify the change, and correct it before moving on.
Prepare CapCut and the extension
Prepare a short talking-head video with one speaker. It is the best learning case because cuts, pauses, and captions are easy to verify. You need:
- Google Chrome on a computer.
- A paid Claude account with access to its Chrome extension.
- A CapCut account and the raw video stored outside the project.
- Any logos, screenshots, images, or supporting clips you want to use.
- An objective and target duration, such as: “Explain three content mistakes in under 45 seconds.”
CapCut saves changes while you work. Keep the original file and make a project copy if your account offers that option. You will always have a clean point to return to.
- Install the Claude extension
In Google Chrome, open the Chrome Web Store and search for Claude, published by Anthropic. Click Add to Chrome, confirm the installation, and sign in to your Claude account. Then open Chrome’s extensions menu, find Claude, and click the pin so its icon remains visible in the toolbar.
Clicking that icon should open Claude’s side panel without taking you away from the current tab. You will enter every instruction in this guide inside that panel.
- Prepare the project in CapCut Web
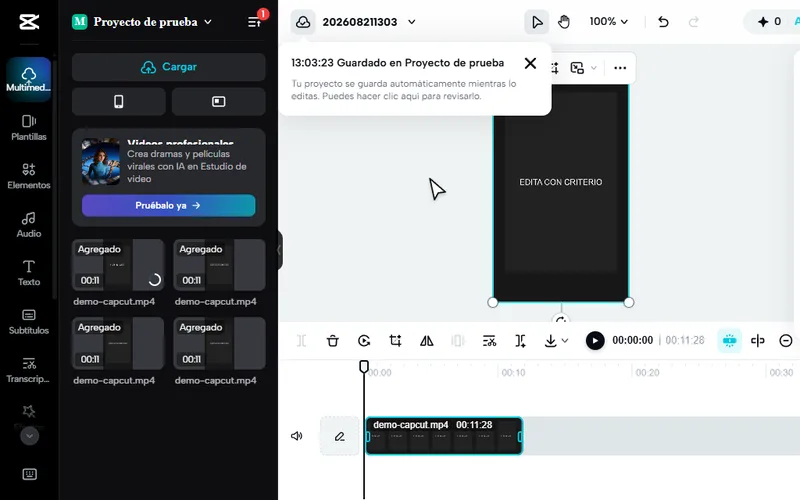
Open CapCut Web, create a project, select a 9:16 canvas, and upload the raw video. Add it to the timeline. Upload the visual assets Claude can use later and give them recognizable names such as product-screenshot.png or final-demo.mp4.
Manual setup: upload the raw footage and place it on the timeline before asking Claude to edit.
Confirm Claude can operate CapCut
Do not give Claude a twenty-change request until you know it sees the correct project and can operate its controls. Start with a read and an action that does not modify anything.
- Open the side panel over CapCut
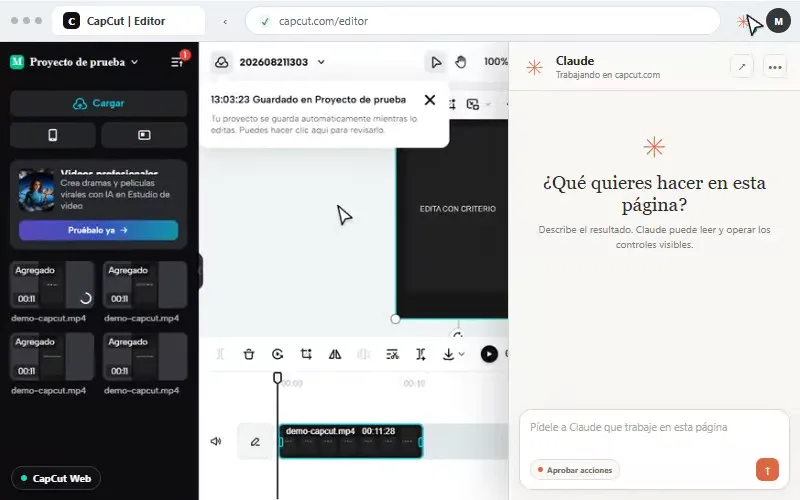
With the CapCut editor still visible, click the Claude icon. The browser will show CapCut and the side panel at the same time. Do not open another tab with claude.ai: enter each prompt here so the extension can see and operate the open project.
Select Manually approve for your first edit. When Claude presents its plan, confirm that it requests access only to capcut.com and does not include publishing, downloading, or deleting media.
What you should see: Claude's side panel stays open next to the CapCut project. - Run a read-only check
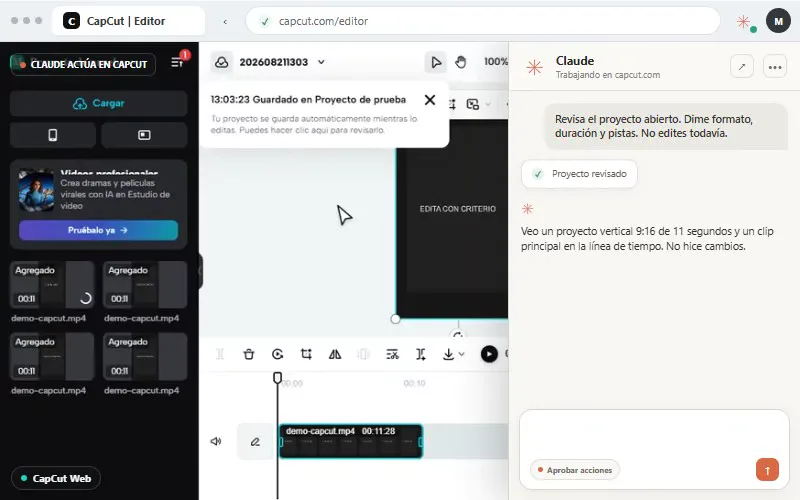
Paste the following prompt into Claude’s side panel while CapCut remains open. Its answer should match what you see on the timeline.
Project check: paste this first
Work on the project currently open in CapCut Web. Do not modify anything yet.

Inspect the tab and tell me:
1. Which project is open.
2. Which aspect ratio it uses.
3. How long the timeline is.
4. How many clips, audio tracks, and text tracks you can identify.
5. Which controls needed for editing you can see.
6. Which detail you cannot verify from the interface.

Do not make cuts, delete media, or open Export. If something is not visible, say so instead of assuming.
Test passed: Claude reads the visible project, reports its format, duration, and tracks, and changes nothing yet. If Claude describes another project or invents tracks that do not exist, stop the task. Refresh CapCut, reopen the panel, and run the check again.
Define the result before editing
“Make it dynamic” does not define what to cut or what must remain. An executable brief gives Claude a measurable outcome, constraints, and approval points.
Select the pencil to complete the bracketed fields. Or leave this guide open and tell Claude from the side panel: “Select the pencil on the Master editing brief, complete its fields with what you know about my video, and ask me only for what is missing.” Review the result, copy the prompt, and reset it if you need to start over. Claude should not edit in CapCut yet.
Master editing brief
I want you to edit the project you already checked directly in CapCut Web. OBJECTIVE What the viewer should understand, feel, or do AUDIENCE AND PLATFORM Who it is for / Reels, TikTok, or Shorts FINAL RESULT Duration: 30 to 60 seconds Format: 9:16 Pacing: natural, fast, or measured Hook I want to test: line or moment YOU MUST KEEP Required lines, demonstrations, product, logo, or closing ASSETS AVAILABLE IN CAPCUT Names of images, clips, logo, and music already uploaded VISUAL RULES Caption style, colors, position, transition type BOUNDARIES - Do not invent words that are not in the audio. - Do not remove a complete sentence without showing me the section first. - Do not use assets that are not already in the project. - Do not publish, download, or replace the original. - Do not open other websites. WORKING METHOD 1. Inspect the project and prepare a plan in passes: rough cut, hook, captions, visual inserts, transitions, audio, and final review. 2. For each pass, explain which CapCut controls you will use and which result I can verify. 3. Flag any action you cannot safely execute through the visible interface. 4. Do not edit yet. Wait for me to approve or correct the plan. 5. After approval, execute one pass at a time inside CapCut, summarize the changes, and wait for my review before continuing.
Approve the plan only if it keeps that order and ends each stage with something visible you can verify. If Claude proposes editing everything at once, ask it to split the work.
Clean up the main cut
Claude should now act inside CapCut. Keep the same conversation so it retains the brief, and approve a pass only after the previous one looks right.
CapCut Web does not offer Auto Cut. Do not ask Claude to click a feature that does not exist. Use transcript-based editing if it appears in your account, or use auto captions as a map of the spoken content. Claude can locate candidates and then execute cuts with the visible split and trim controls.
Execute the rough cut
Start the rough-cut pass and operate directly in CapCut Web.

1. Open transcript-based editing if it is available. If it does not appear, generate auto captions to locate the lines and use the timeline to make cuts.
2. Find long silences, filler words, repetitions, and failed sentence starts.
3. Work in batches of no more than five candidates. Before cutting, show me the approximate time, affected words, and reason for each candidate.
4. Wait for me to approve the batch.
5. Apply only the approved cuts. If the transcript cannot remove the section directly, use Split at its start and end, remove the section, and close the visible gap.
6. Keep breaths, expressive pauses, and complete sentences.
7. After each batch, move the playhead a few seconds before every join and play it for my review. If a word is clipped, undo only that join.

Do not add final captions, music, effects, or transitions yet. When finished, tell me the previous duration, the new duration, and which sections you removed.
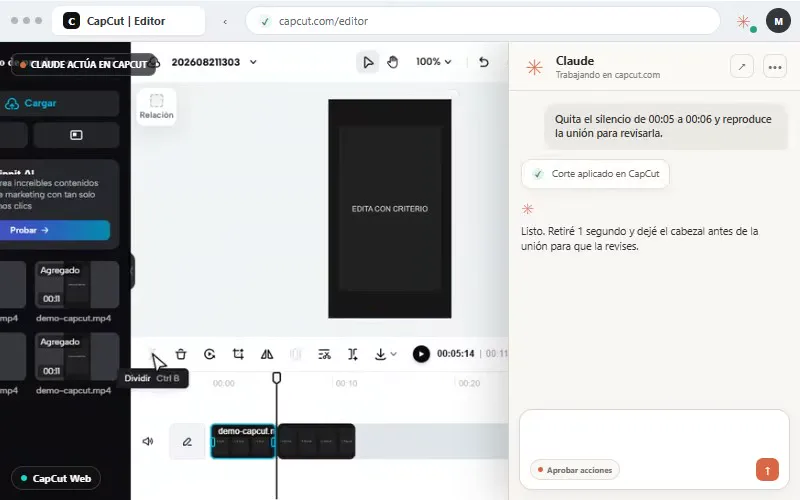
Your ear decides whether a pause belongs. If a join cuts a word or makes the voice sound unnatural, give Claude the exact time and ask it to undo only that change.
Strengthen the opening
A video without silences can still start slowly. Have Claude use the visible transcript to find a stronger opening before it rearranges clips.
Choose and execute the hook
Review the transcript of the current cut and propose three openings that last no more than 3 to 5 seconds.
Each option must:
- Use words that already exist in the video.
- Communicate the benefit, conflict, or result before the context.
- Identify which section you would move or keep and where it appears.
- Explain which information must follow so the video still makes sense.
Do not change the timeline until I choose an option. When I reply with the selected number:
1. Split the selected segment at its exact boundaries and move it to the beginning.
2. Close any gap without trimming neighboring words.
3. Keep the required lines from the brief.
4. Play the first 10 seconds so I can check promise, continuity, and pacing.
Do not remove the original context until I approve this new opening.If no existing line works as a hook, do not force Claude to fabricate one. Record a new take or create a title card, then return when that asset is uploaded to the project.
Finish the edit
Create accurate, readable captions
Generate captions after approving the cuts. CapCut Web can create auto captions and edit their text, segments, and style, but recognition can miss names, brands, accents, or noisy speech.
Captions ready to publish
Now execute the caption pass in CapCut Web. 1. Open Auto Captions, select language, and generate captions from the main voice track. 2. Correct these names and terms with the exact spelling shown here: list. 3. Split blocks that are too long at natural pauses; use one or two lines and avoid leaving a word by itself. 4. Use one consistent style throughout the video and confirm the text has contrast over both light and dark backgrounds. 5. Keep text inside the safe area without covering the face, product, or Reels and TikTok controls. 6. Do not change the spoken content. If you cannot confirm a word, give me its time and wait for my correction. 7. Show me the opening, a midpoint, and the closing. Wait for approval before continuing.
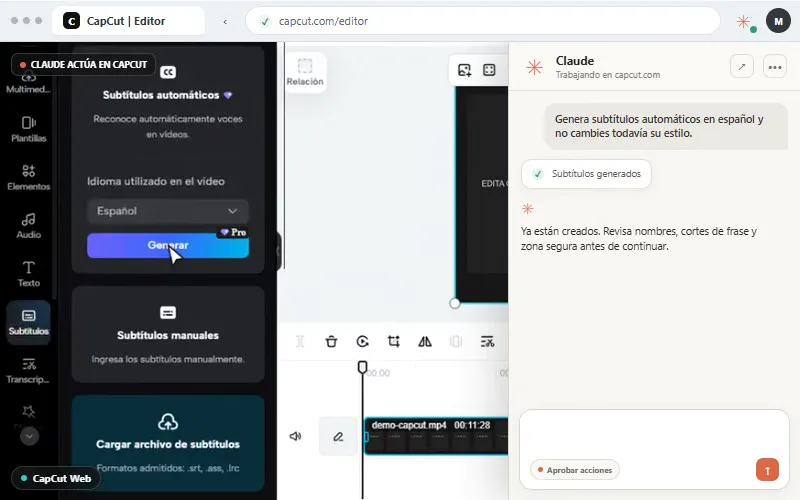
Play the video once without sound and read only the captions. If the message no longer makes sense or a block disappears before you can finish reading it, correct that section before moving on.
Add visual support without overediting
Start with direct cuts. A transition is useful when it connects two clips, marks a new section, or softens a time jump. It does not need to appear at every join.
Visual inserts and transitions
Execute the visual pass using only assets already uploaded to CapCut.

1. Review the cut and propose up to three moments where a screenshot, image, B-roll clip, or zoom would clarify the idea or regain attention.
2. For each moment, give me the line, asset, in point, out point, and purpose.
3. Wait for my approval.
4. Place each asset on a track above the main clip, align its entrance and exit with the line, and check its crop or framing. Do not accidentally replace the main clip.
5. Confirm that no asset covers captions, the face, the product, or important information.
6. Review the joins. Keep direct cuts by default. Only between adjacent clips with no gap, add a transition when there is a reason; use one consistent style with a short duration.
7. Play two seconds before and after every modified section for my approval.

Do not search for or download external assets. Do not add decorative effects that are missing from the brief.
This pass is complete when you can explain the purpose of every supporting asset in one sentence. If an element only “looks nice,” remove it.
Review the audio
Once the image pass is approved, ask for the audio mix separately. Claude can move the visible controls, but you must listen to the video and tell it where a cut sounds audible, the music is too loud, or noise remains.
Supervised audio mix
Prepare the audio pass in CapCut.

1. Select the voice clip and show me the available volume, noise reduction, and voice enhancement controls. Do not change anything yet.
2. Play a noisy section. Turn on only noise reduction and play the same section again so I can compare. Keep the change only if the voice still sounds natural.
3. Keep the voice as the primary track. Lower the music during speech until every word is clear and avoid abrupt volume changes.
4. Play the opening, the section with the most layers, and the ending so I can listen.
5. Wait for my timecodes and correct only the points I identify. Do not claim the audio is good: I approve it by listening.

Do not export yet.
Watch the complete video without stopping. Make three human passes: first message and pacing, then framing and captions, and finally voice, music, and audible cuts. Note every issue with its timecode. Claude can correct that list without rebuilding the rest.
Export and save the workflow
Play the entire video one final time and confirm that the previous review’s corrections remain intact. Only then ask Claude to prepare the output.
Final quality check and export
Run the final quality check on the project open in CapCut. Visually inspect: 1. Duration and 9:16 format. 2. Black frames, gaps, or misplaced clips. 3. Captions that are cut off, outside the safe area, or styled inconsistently. 4. Inserts that start late, end early, or cover information. 5. Unnecessary or inconsistent transitions. 6. Whether the closing is complete. Correct only visual problems you can verify. Then open Export and prepare: - Name: video-name - Format: MP4 - Resolution: 1080p or available option - Frame rate: match the source footage Do not start the download or publish. Show me the settings and wait for my final approval.
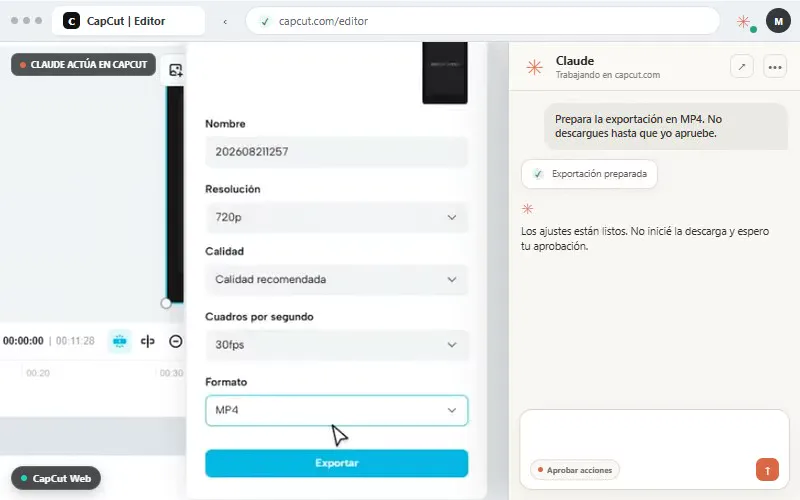
When everything matches, approve the download. Open the downloaded MP4, not only CapCut’s preview, and check the opening, a midpoint, the ending, captions, and audio. Only that verified file is ready to publish. Save the master brief and the corrections that worked.
Once the first edit works, you can teach that sequence to the Claude extension and repeat it in other projects. Type / and choose Record workflow —or use the record icon if it appears in your panel—, perform the workflow you want to preserve once, and stop the recording. Save a shortcut called “CapCut rough cut” with this sequence:
- Check the project, format, and duration without editing.
- Open the available transcript.
- List candidate pauses, filler words, and mistakes.
- Wait for approval.
- Execute the approved cuts and show every join.
- Report the new duration and summarize the changes.
For the next raw clip, open the project, provide the master brief, and run the shortcut. Keep the hook, visual decisions, audio review, and export outside the shortcut. Those stages change with every video and require judgment or approval.
Before closing, confirm that you finished with:
- A vertical video with pauses and mistakes removed by Claude in CapCut.
- A hook selected from the real source material.
- Captions that are generated, corrected, and placed inside the safe area.
- Visual inserts and transitions with a clear purpose.
- Voice and music reviewed by a person.
- An approved export and a reusable brief.
Common problems
Claude explains the steps but does not edit CapCut
Confirm that you opened the extension’s side panel next to CapCut and approved the plan. Tell it: “Execute this action yourself in the open project. Do not explain how I should do it.” Then ask for one action and name the visible control.
Claude cannot see the project
Refresh CapCut, wait for it to finish loading, and reopen the panel. Check the permission for capcut.com. If you use Team or Enterprise, your organization may have blocked the site.
Claude cannot operate a timeline control
Zoom into the timeline, keep the clip and control visible, and request one atomic action. Interfaces with heavy JavaScript can fail intermittently. If the control still does not respond, make that single adjustment yourself and let Claude continue with the next stage.
I cannot find Auto Cut in CapCut Web
Auto Cut is available on CapCut mobile and desktop, but not on Web. Use transcript-based editing if it appears in your account, or let Claude apply visible cuts with Split and trim.
The auto captions contain mistakes
Give Claude the correct spelling and exact time. If there are many errors, temporarily mute music and effects, remove the captions, generate them again, and review once more.
Claude asks for approval during export
That is expected. Downloads are protected actions even when you use automatic approval. Check the name, format, resolution, and frame rate before allowing it.