Filter AI slop on X with Jev
Set up a filter that blurs generic posts in your feed and lets you reveal them whenever you want.
Jev can blur posts on X that read as generic or repetitive. You choose which ones to reveal.
99% of people still get this wrong. These 7 AI tools will change your life. Number 4 will blow your mind.
Reply · Share · SaveDownload the kit, ask your assistant to prepare it, and activate it in Chrome. You can also follow the manual option.
Before you start
You need Chrome on a computer and an API key from TypeSafe. Create a key in your account’s API keys section. For the assisted option, use Codex or Claude Code with access to a local folder.
While active, the filter sends post text to TypeSafe and may use your account’s credits. Jev can make mistakes: it does not prove AI authorship or analyze images and videos.
1. Download the kit
Download the Jev filter for X (.zip)
Extract the ZIP and keep the Folder: jev-x-filter folder somewhere permanent. Chrome will keep using that location, so avoid moving it afterward.
What's inside the folder?
- File: server.mjs: the program that connects the filter to Jev.
.mjsmeans it contains JavaScript code. You will run it with Node.js. - File: .env.example: the template you will copy to create File: .env and save your API key.
- File: README.md: the kit’s instructions. Open it in your text editor;
.mdis a text format called Markdown. - Folder: extension: the folder you will load in Chrome to apply the blur.
2. Prepare the filter
With Codex or Claude
Open Folder: jev-x-filter as a project in Codex or Claude Code, with access to its files and terminal. Copy this instruction:
View and copy the instruction
Set up the Jev kit for X in the folder I have open.

1. Check that it contains server.mjs, .env.example, and extension/manifest.json. If this is the wrong folder, ask me to open jev-x-filter.
2. Check that I have Node.js 22 or later. If missing, guide me through installing it from nodejs.org.
3. If .env is missing, create it from .env.example. Preserve it if it already exists. Tell me how to open it so I can save my TypeSafe API key myself. Do not ask me to paste the key into chat or display the file's contents.
4. Once I confirm I saved the key, run node --env-file=.env server.mjs from this folder. If port 3333 is occupied, explain how I can close the previous instance; do not stop other processes yourself.
5. Check that http://127.0.0.1:3333/health responds with ok: true. This only confirms the local server is running; do not make TypeSafe requests to test it.
6. Give me the exact path of the extension subfolder to load in Chrome. If you cannot keep the server running, give me the command and folder to start it in my terminal.

Use the kit's files. When finished, explain what you prepared and remind me to load the extension in Chrome and activate the filter from the X console.
When prompted, open File: .env, replace replace_with_your_key with your key, and save. Tell your assistant it is ready so it can start the server.
Once Jev ready / listo appears, continue to step 3. Keep the server process running while using Jev.
Manual
Install Node.js 22 or later if you do not have it yet. Then follow these steps:
- Save your API key
Open the extracted folder in a text editor such as VS Code. Duplicate File: .env.example, name the copy File: .env, and replace the example text with your key:
TYPESAFE_API_KEY=paste_your_key_hereSave it as plain text. Its name must be File: .env. Some editors add
.txt, the extension for text files: if it becomes File: .env.txt, remove the trailing.txtso the filter can find it. If Finder hides files starting with a dot, press Command + Shift + .. Keep your File: .env private and do not paste the key into X. - Start the filter on your computer
Open a terminal inside the folder Folder: jev-x-filter, next to File: server.mjs. On Windows, right-click the folder and select Open in Terminal. In VS Code, open that folder and choose Terminal → New Terminal.
node --env-file=.env server.mjsYou should see Jev ready / listo. Keep the terminal open while using the filter. There are no packages to install and no second Chrome window to open.
3. Activate it in Chrome
These steps are the same for both options. Complete them in the Chrome browser where you use X.
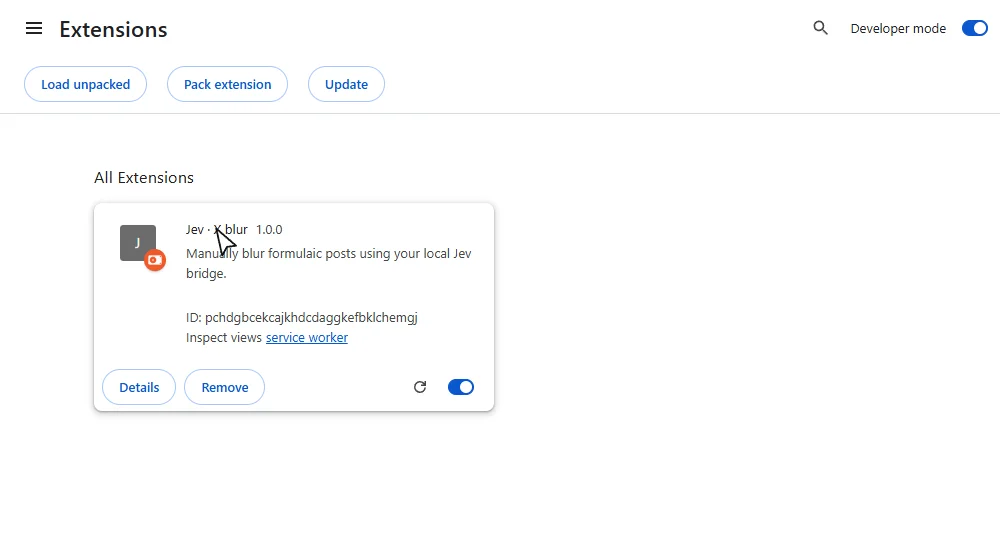
- Load the extension in Chrome
Type
chrome://extensionsinto the address bar. Enable Developer mode, click Load unpacked, and select the kit’s Folder: extension subfolder.You will see Jev · X blur among your extensions. Open x.com/home and reload the page. If you have an older version of the filter, disable it first to prevent both versions from processing the same posts.
- Activate it from the X console
With X open, press Ctrl + Shift + J on Windows or Command + Option + J on Mac. Select the Console tab in developer tools. Paste this and press Enter:
window.postMessage({ type: "JEV_START" }, location.origin);Chrome may warn you about pasting code. Read the command and follow the on-screen instruction if you choose to enable pasting. This command tells the installed extension to start filtering.
Once [Jev] Filter active appears, you can close developer tools and scroll through your feed. The kit blurs posts when Jev’s score reaches 0.8. That score reflects the filter’s criterion; it is not proof of AI authorship.
Use it as you browse
Click Show post to read any blurred post. Blur again restores the effect. The filter preserves the post’s size.
Each activation allows up to 100 new requests in that tab. At the limit, it stops analyzing and logs a console message. Paste the start command again to continue. Recent results are reused in memory; closing or reloading can cause new requests.
To stop the filter and remove all blurs, paste:
window.postMessage({ type: "JEV_STOP" }, location.origin);A request already sent may still finish and use credits. To shut down the local server, return to its terminal and press Ctrl + C.
Next time: start the server, open X, and paste the start command. Activate it again after reloading X or opening another tab. The kit stops when you enter messages and skips posts shorter than 20 or longer than 12,000 characters.
Something not working?
| What you see | What to do |
|---|---|
node is not recognized |
Install Node.js 22 or later and open a new terminal. |
| Cannot find File: .env or File: server.mjs | Open the terminal in the extracted folder. Make sure the configuration file is named File: .env, without a trailing .txt. |
| Port 3333 is in use | Stop the previous server with Ctrl + C. Start the kit’s server. |
Pasting the command only shows undefined |
That return value is normal, but a Jev message should also appear. If it does not, enable the extension, reload X, and paste the command again. |
| Local connection error | Keep the terminal showing Jev ready / listo open. Check that http://127.0.0.1:3333/health shows {"ok":true}. |
TypeSafe HTTP 401 or 403 |
Check your key and account access. Restart the server after editing File: .env. |
TypeSafe HTTP 429 |
Check your balance and account limits. Wait before activating the filter again. |
| Active, but no blur | Posts may not meet the threshold. Check the console for errors or the 100-request limit. Image-only posts are not evaluated. |
| An extension update has no effect | Click reload on its card at chrome://extensions, reload X, and activate the filter again. |
If X changes its post structure, the kit may need an update. You can stop it at any time and keep reading your feed.
Code and references
The ZIP contains the filter’s source code. File: server.mjs contains the criterion sent to Jev; File: content.js, inside Folder: extension, applies the blur and sets the threshold. You can review both before running them.
See the TypeSafe API, the noul score, and Chrome’s instructions for loading local extensions.